Labelling MiniDisc: part 2
This post is a follow up to Part 1
A Raspberry Pi HAT is fine but one downside is that you need a Raspberry Pi. And a micro SD card. And to install Linux on it. And configure it. And so on.
So I started thinking about a single PCB design that would not rely on external components.
Interfacing
The goal was to drive a digital potentiometer from a PC app, preferably without any additional drivers which are always a source of attrition for users. My initial idea was to use some kind of uC which would present a HID device to the host computer and talk with the digital pot over SPI. This seemed a bit daunting at first from the software side. An alternative path would be to use a UART-SPI bridge like FT232H. This pointed me to an existing product by Adafruit which had all its functionality nicely exposed in a Python library. It was not perfect though, as it still required the user to install a generic USB driver with a third party tool. Way too fiddly and at $15 a bit expensive, too.
But this pointed me towards another product: Adafruit MCP2221A. And it was exactly what I wanted: a cheap USB bridge that presented a generic HID device interface supported by the Adafruit Blinka library. No driver installation needed. Perfect!
Well, almost. MCP2221 does not talk SPI. However, there are plenty of I2C digital pots on the market so I decided to switch to AD5245 from Analog Devices in a tiny SOT23-8 package.
Prototyping
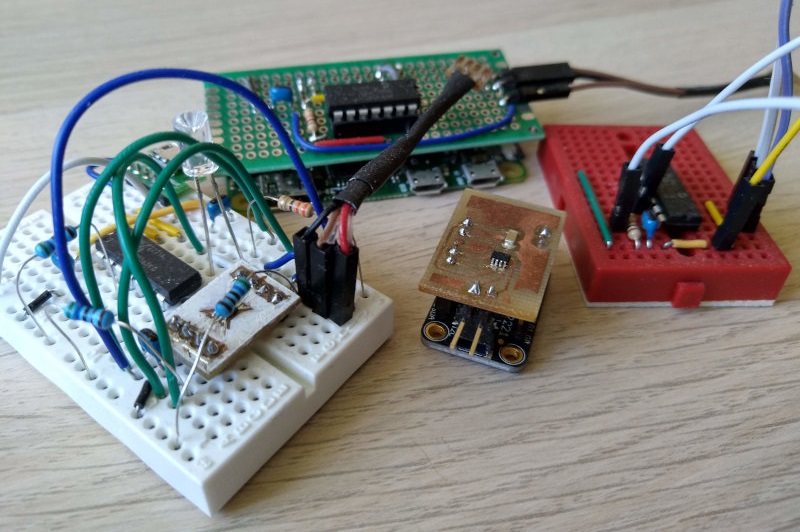
A couple of prototypes were created along the way. The red breadboard is the original circuit from the first part. The green protoboard is the same thing but as a HAT slotting on top of a Pi Zero. White breadboard spider is a prototype using MCP2221A and AD5245. And in the middle is an etched little "HAT" for the Adafruit breakout board.
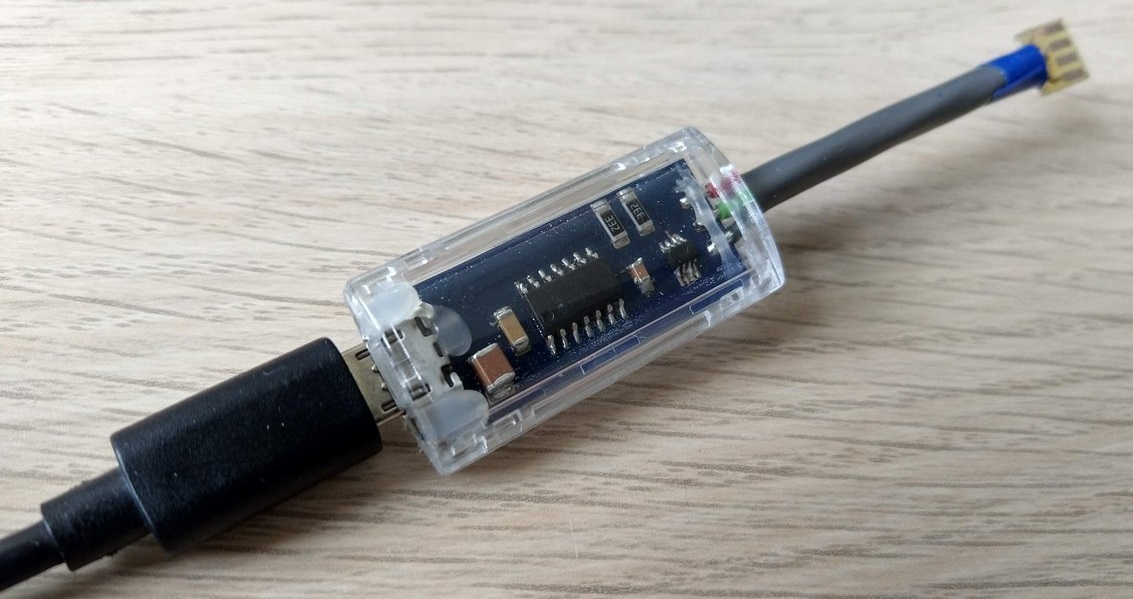
This has worked well but it would still require people to separetly buy the Adafruit breakout which was a bit inconvenient. So instead I decided to incorporate the MCP2221 IC directly into my design.
Some fiddling in KiCad later I came up with this single-sided board.
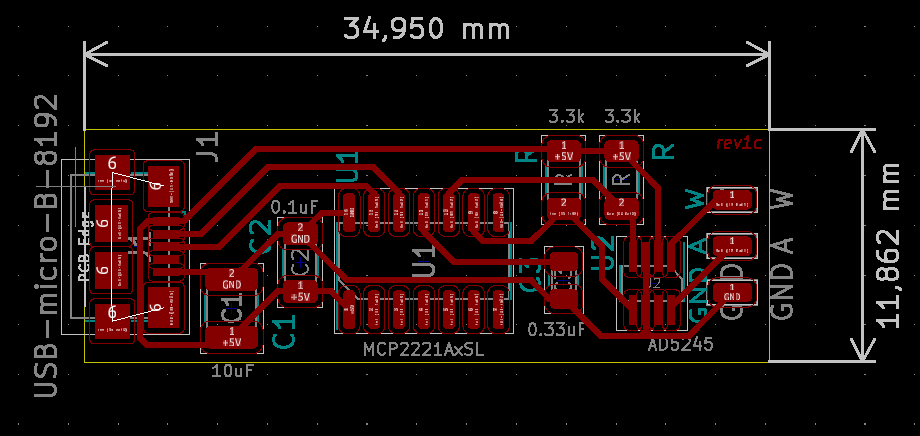
I chose the dimensions so it would fit in a generic enclosure made for USB sticks. I ordered the PCBs from a local company, got most of the components from TME and Farnell and a few days and some soldering later ended up with these:
Software
The logic of converting track names into sequences of buttons to press remains largely the same. A Python script talks to the music player (Foobar2000) over a REST API, breaks the titles down into letters and uses the Blinka library to interface with the digital pot over the MCP2221 USB-I2C bridge. To make it a bit more user-friendy I've added a very basic GUI using Gooey then packaged it for Windows with PyInstaller and NSIS.
I have also made sure that it works on GNU/Linux with the DeaDBeeF music player.
You can actually get one
And you can have one, too! I've launched the product on tindie and sold several units already. It feels satisfying to turn an idea into a tangible thing which solves a real problem. This is just a hobby for me (I am trained in a completely different field) but I certainly learned a lot and I am glad I managed to bring this project to an end.
All in all I have build 9 units (one was lost to a sudden release of Magic Smoke) and probably won't make more after these are gone as soldering proved to be quite laborious. But you will be always able to build your own as the software and hardware is open sourced.
Lessons for the future
In retrospect, I think that avoiding writing my own drivers and instead leveraging the Adafruit libraries was the right decision. I would easily get bogged down implementing my own HID interface and with Blinka I could directly focus on the 'business logic' of pushing buttons.
On the hardware side, by far the largest difficulty was soldering the SMD micro USB connector from Amphenol by hand. I do not have a hot plate or a hot air station and the leads of the connector were very closely spaced and partially obscured by the shield. Next time I'd opt for a different part or better tools.
I would probably also directly integrate the remote connector into the PCB design but I wanted to avoid extra milling costs from my fabricator.